
This article is the first in the series of “Top 10 FireFly Tips & Tricks” We’ll be covering ways to make the most of the FireFly POS system. In this article, we’ve got some tips for you to maximize the efficiency of your menu setup.
1. Mix and Match Items on Menu Screens
It makes a whole lot of sense to organize your menus into logical categories, using the left hand tabs to keep sandwiches separate from salads. But it also makes sense to give quick and easy access to those frequently combined items that you add to every order. With FireFly point-of-sale, there’s no need to limit each item to one button on your menu. Why not put your Buffalo Wings on the Pizza Menu, or your Fountain Soda and Chips on the Sandwich, Salad and Lunch menus? How do you add a menu item? Check out the video here!
2. Use the menu link function
When you need to guide servers through the ordering process, the Menu Link function lets you reduce keystrokes and confusion by bringing up a sub-menu with more choices. When creating a menu button, you can choose “Menu Link” as the button type, then just choose which Menu Tab you want to link to. For instance, if you have a lot of Pizza Toppings, you might put just the most popular ones on the main Pizza screen, then create a button called ‘More Toppings’ that links to a more complete Toppings screen. You can make the Toppings screen inactive, so it won’t have a tab in the POS.
For “Build-your-own” type items that allow users to choose their items, our new Menu Item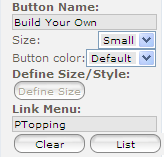 Link function is a great alternative to the requirements pop-up. To use the Menu Item Link, just create an item button, but at the bottom of the button set up specify the menu to link to. Now when the user touches the button, the item will be ordered AND the link menu will appear. (This is new in version 6_06_06)
3. Customize your graphics
Pictures give your restaurant a distinct identity and can help employees to quickly find what they are looking for. But you aren’t limited to the generic picture collection that came with your POS. You can load your own custom pictures to use for menu buttons. Just make sure the file sizes are small (we recommend under 15k), so avoid any performance hits. You can navigate to your POS Server from any computer on your network, and put the images in the folder homes/firefly/public_html/final/images/ButtonImage/. Once in this folder, you'll see them from the menu designer tool.
4. Make Colors have meaning
Big buttons, small buttons, wide buttons and Extra Large buttons, combined with lots of pretty colors can make for a crazy looking menu. Tame those wild tendencies and use color to your advantage! Use color to indicate an item type (meat, veggie) or price (domestic vs. premium beer). We’ve seen clever uses of color to indicate special dietary requirements (green is gluten free, orange is vegan, etc.).
5. Use the Item Search Function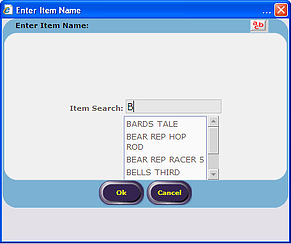
Got a lot of items that may not be ordered all that often? If you’ve got a large wine list, dozens of specialty beers, or even some retail items, the Item Search function is a great way to quickly order an item even if you can’t find its button. Just type the item name or PLU #. Check out this video on how to set up the item search!
6. Make Unavailable Items Disappear
Keep mistakes to the minimum by hiding items that are unavailable. If an item will be off the menu for a while, you can “hide” the button in the POS by checking the “inactive” box in item setup. The Menu Designer will still show a placeholder for that item, so you won’t overwrite it, but the servers won’t see it. Then, next summer when your Summer Salad is back in season, just activate the item again.
If you’ve got an item that you run out of periodically, such as a specialty beer on tap or a unique topping, the menu Out of Stock feature is a quick and easy way to temporarily inactivate the item right from your Manager Alert. Once Out of Stock, it will appear with a red X on the menu. When you’ve got the item back in, just move it back to the “In Stock” side. Here’s a video that explains it! (This is a new feature in version 6_06_06)
Finally, for those items that always come in a limited quantity (like that delicious cheesecake you get from the bakery next door) the Item Countdown feature lets you specify exactly how many you have, and will display the number remaining on the button. You can activate Item Countdown on the individual item’s set up screen. When the item is gone, it can’t be ordered until you update the quantity on hand.
7. Get Quick to the Cash
During the busy lunch rush, every second counts. Make ordering faster by building in Quick Tender Keys right on your lunch menu. These shortcuts can include an amount and tender tye, like $10 Cash, Exact Cash, or Exact Credit. They can also default your order type so it just takes one button push to finish the order, completely bypassing the normal tender screen.
8. Build in Sizes
When every button touch counts to speed up the order entry process, look for ways to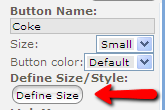 eliminate unneeded buttons. For example, if you have multiple sizes for your drinks, you might want to create a row of buttons for “Fountain Soda” and a separate row for “20 oz Coke”, rather than picking “Coke” and a size in two keystrokes. It’s easy to do this with the built in “Size / Style Default” when you are creating an item button on your menu.
9. Change as the day goes on
Got a complex menu that changes for lunch and dinner? Avoid mistakenly ordering the “lunch” portion at dinner and simplify the navigation for your servers by hiding certain menus based on time of day, or even on certain stations. If your happy hour menu is only available in the bar, you can hide it on the other stations. All this is done in the “Menu Setup” page of the menu designer, which appears on the right when you select a menu tab.
10. Manage Your Menus Centrally
Got more than one store? Make menu management a lot easier with the FireFly Central Menu Management tool. This allows you to maintain a master database, sending items, menus, coupons and even inventory set up to your other stores whenever you want to do an update. This add-on module is available as a monthly subscription. Contact GRS at 800-750-3947 to learn more.
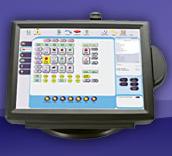
FireFly point-of-sale is one of the powerful, business building tools GRS offers! You can learn more about the FireFly system here.